Ultrasonic Cleaning
Answering Your Questions About Ultrasonic Cleaning
We've collected a list of ultrasonic cleaning FAQs and provided answers below. Our goal is to cover the fundamental questions about ultrasonic cleaning.
Still have questions? Call or chat with us for an unbiased answer.
Need help choosing a system?
Tell us what you want to clean. Share the type and size of your part, soils, and throughput. We'll recommend the right tank size, frequency, accessories, and cleaning chemistry.
Questions About Selecting
How does an ultrasonic cleaner work and what is cavitation?
An ultrasonic cleaner has three main components: liquid-filled tank, transducers bonded to the tank bottom, and a generator that sends electrical energy to the transducers. Electrical energy causes the transducers to vibrate, and this in turn causes the tank bottom to vibrate up and down. When the tank bottom goes up, the liquid in contact with the bottom surface is compressed, and when the tank bottom goes down, the liquid in contact with the bottom surface expands. Compressed liquid has positive pressure; expanded liquid has negative pressure. Waves of positive and negative pressure continuously travel upwards through the liquid away from the vibrating surface. When these waves occur at high frequency and intensity, the stress on the liquid causes it to crack and form small voids. The voids, or bubbles, are filled with either vacuum or vapor from the surrounding liquid. The formation of these bubbles is called cavitation.
As the sound waves travel through the liquid an area of negative pressure is replaced with an area of positive pressure or compression. The cavitation bubbles oscillate and grow with each passing wave until they become unstable. The pressure surrounding the bubbles causes them to violently collapse or "implode". The energy released by this collapse is focused on a very small area. The pressure and temperature in the region of the implosion are extraordinarily high, but last only an instant. The imploding bubble shoots out a jet on a microscopic scale.
These images capture a microscopic cavitation bubble as it implodes and shoots out a jet.
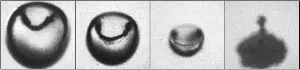
The extremely high energy released by millions of cavitation bubble implosions is what accomplishes ultrasonic cleaning of nearby solid surfaces.
What size tank do I need?
Two points to keep in mind. Tank size and basket size. Basket dimensions are smaller than tank dimensions. Determine the dimensions of the largest parts you will be cleaning and select equipment with a basket size that accommodates those parts. For example, the 4.7 gallon Elmasonic Select 180 has tank dimensions 12.9 x 11.8 x 7.9 inches deep with basket dimensions 11 x 9.8 x 4.5 inches deep. Caution: separate, do NOT stack parts in the basket for optimal cleaning results.
How do I choose the optimum ultrasonic cleaner frequency?
Here are some suggested frequencies.
- 25 kHz for the removal of coarse and tenacious adhesive contaminants and for pre-cleaning of robust surfaces such as stainless steel and cast iron
- 35-45 kHz is the standard frequency range for most cleaning jobs and for cleaning tasks in the laboratory and sanitary sector
- 80-130 kHz is used for the finest cleaning jobs and for the cleaning of highly sensitive surfaces such as micro electronics, precision optics, and polished aluminum
For more details please check our post on how ultrasonic cleaners work.
What is sweep?
Ultrasound at a fixed frequency creates fields of high and relatively low ultrasonic intensity, which can yield uneven cleaning results. Sweep is the term used to describe a continuous slight modulation of the ultrasonic frequency. This produces a more uniform distribution of the cavitation process and delivers better performance in the cleaning bath.
What is pulse?
The pulse mode provides brief spikes in power to remove stubborn contaminants or for mixing and sample prep.
What is degassing?
A freshly filled ultrasonic tank contains air, as exemplified by bubbles observed when placing an item in water. If not removed through degassing, the dissolved gas will diffuse into the cavitation bubbles, which dampens the intensity of their implosion and reduces cleaning effectiveness.
To ensure optimal cleaning, the tank should be filled with cleaning solution, heated to the final operating temperature, and run in degas mode before starting the cleaning process.
In degas mode, the ultrasonic cleaner alternates between on and off cycles. During the "on" cycle gas bubbles form and coalesce; during the "off" cycle the bubbles rise to the surface and burst. Degassing usually takes about 10 minutes.
If the ultrasonic cleaning unit lacks a degas mode, it can still be degassed by operating the ultrasonic power for about 15-20 minutes. An experienced user will discern a change in the sound produced by the unit when the liquid has been fully degassed.
If the solution has been degassed, but allowed to cool to ambient temperature overnight, it should be degassed briefly (e.g., 2-5 minutes) before the next cleaning session.
What is Eco Mode?
The Eco Mode, a feature of the Elmasonic Select series, is selected for gentle cleaning and a quieter operation, achieving a lower intensity cleaning cycle with sweep frequency.
What is Dynamic Mode?
The dynamic mode optimizes cleaning results by automatically combining the sweep mode for uniform cleaning with the pulse mode that removes stubborn contaminants. It is a feature found in the Elmasonic E Plus, Elmasonic Select, Elmasonic Xtra, Elmasonic xtra TT, and Elmasonic xtra ST ultrasonic cleaners.
Questions About Using
What liquids can I put in the tank?
At the very minimum water and a few drops of dishwashing liquid. Best cleaning results are obtained when using an ultrasonic cleaning solution formulated for the cleaning tasks at hand. These are offered as biodegradable concentrates with instructions on dilution and cleaning temperatures. Do not fill the tank with flammable solvent unless the unit is designated as explosion proof. For more details see our post on cleaning solution selection tips.
How do I know what ultrasonic cleaning solution to use?
Most ultrasonic cleaning solutions marketed today are biodegradable, are shipped as concentrates and are formulated as: acidic, neutral, or alkaline.
- Acidic solutions are used to remove rust and mineral deposits from ferrous metals, but not for light alloys susceptible to corrosion.
- A mildly alkaline ultrasonic cleaning solution is suitable for removing oil, grease, dust, soot and other organic compounds on glass, plastic, ceramic, rubber, iron and non-ferrous metals. Mildly alkaline detergents containing enzymes are used to remove blood and tissue from medical instruments.
- An ammonia-containing alkaline solution cleans laboratory appliances, work pieces and jewelry made of glass, ceramic and precious metals. It also brightens jewelry and non-ferrous metals.
- Strongly alkaline (caustic) solutions are used to strip burned on plastic residues from metal injection molds.
- Very delicate materials made of plastic, glass, metals and rubber call for a neutral solution to remove impurities such as dust, grease, pigments and other organic compounds.
- Nonflammable semi aqueous organic microemulsions are used to strip paint, coatings, adhesives, grease, and shellac from metal surfaces. These formulations may be either acidic or neutral and are not classed as biodegradable.
- Nitric, sulfuric, formic, or hydrofluoric acid should only be used when an acid-resistant plastic tub is placed in the tank to protect the stainless steel. These solutions are not biodegradable and must be disposed of properly.
Our post on ultrasonic cleaner solution selection tips provides added detail.
Can cold cleaning solutions be used in an ultrasonic tank?
Yes but care must be taken to avoid condensation that can damage transducers.
Is it necessary to use DI water for cleaning with ultrasound?
Before you set up the cleaning process it's important to define "clean". DI water is used when a spot-free surface is required after cleaning. In most cases it is adequate to clean with a cleaning agent dissolved in tap water and rinse with DI water to remove residues. (Also, see answer below about water containing chlorides.)
Can I put flammable media in an ultrasonic bath?
There are two reasons that manufacturers of ultrasonic cleaners do not allow use of flammable solvents in the tank.
Although a new ultrasonic tank is in perfect condition, over a period of years the tank will become worn from cavitation erosion. In the long run, the tank can develop a pinhole in the bottom surface. If this occurs, the solvent could drip directly on the transducers and high-power generator. Such an event is an explosion hazard. This potential risk can be mitigated by placing the solvent in a secondary container which in turn is submerged in a water-filled tank.
Treating a solvent-filled tank with ultrasound will produce flammable vapor. Contact of the vapor cloud with a spark from the generator could result in fire or explosion. This risk is not mitigated by using a secondary container as described above unless the container is relatively small, covered, and used in a well-ventilated area.
Explosion proof ultrasonic cleaners eliminate these risks. An explosion proof ultrasonic cleaner cannot ignite the solvent or solvent vapor. However, explosion proof ultrasonic cleaners are not closed systems and will release flammable solvent vapor into the air during operation. They must be used either in a fume hood or in an area suitably equipped for hazardous vapor. Check our post on cleaning with flammable solvents for more information.
What temperature should I use for cleaning?
Keep in mind that ultrasonic cavitation increases bath temperature. Heated solutions are best for highly contaminated greasy parts. Suggested cleaning solution temperatures are recommended by manufacturers. For example, the recommended cleaning temperature range for widely used degreaser Elma tec clean A4 is 50-80 deg C (122-176 deg F). For removal of blood and biological tissue from used medical instruments, the bath temperature should be under 40 deg C to prevent blood hardening; no heating should be used at all.
How long should I clean my parts?
Cleaning cycle time depends on the number of parts being cleaned, the extent of contamination, and how you define "clean." Cleaning baskets allow you to safely remove parts from the bath for inspection but be aware they will be hot. With experience you'll be able to set cleaning cycle length on the ultrasonic cleaner timer. Limit wear and tear by cleaning for the shortest time that does the job.
Do I need to use a basket?
The short answer is yes. Baskets are designed to suspend parts at the proper level above the bottom of the tank and also prevent damage to the tank. Large parts cleaned in industrial-sized tanks can be suspended in the cleaning solution. Check our ultrasonic cleaner video for more information.
Do I need any type of protective equipment when using my ultrasonic cleaner?
While "ultrasonic" is generally defined as sound above the hearing range, ultrasonic cleaners do make noise due to the vibration of the equipment. Low-frequency (25-45 kHz) cycles are noisier than higher frequency cycles. For long-term exposure options are available: hearing protectors, lids (that also reduce cleaning solution evaporation) and placing the unit in a noise protection box. Some models have an option of a hinged insulated lid to further reduce noise.
What factors affect ultrasonic cleaning effectiveness?
In addition to the ultrasonic frequency, ultrasonic power, cleaning solution chemistry, temperature, time, ultrasonic mode (sweep, pulse, dynamic, eco, degas...) and bath maintenance we suggest this: remove gross contaminants first, disassemble complex components, separate parts in the basket, inspect and reposition if necessary. The user manual provides information on effective operation, and running a performance validation will indicate your unit is operating properly or needs attention. When a high level of cleanliness is required, rinsing after cleaning is critical and multiple rinses may be required. Our post on ultrasonic cleaner benefits and features explains how these cleaner features affect cleaning results.
Do I need to cover the tank during ultrasonic operation?
You don't need to but covers perform important functions. They reduce cleaning solution evaporation and they reduce noise. Covers on some models can be inverted after the cleaning cycle, serving as trays allowing solution to drain back into the tank.
Is it safe to put my hand in the ultrasonic bath during operation?
Absolutely no! Chances are the solution will be hot, but more importantly cavitation will pass through your skin and act on your blood stream.
Questions About Maintaining
How can I check if my ultrasonic tank is working properly?
It's a good idea to run a performance check on your ultrasonic cleaner from time to time. This is especially important if you are cleaning medical instruments and must meet CDC standards. But optimum performance is also important in any cleaning operation to help assure thoroughness and improve throughput.
Inspection of the ultrasonic power with a wattmeter
It's advisable to periodically determine the electrical power consumption of your device. The amount of electrical power input provides indirect evidence that the ultrasonic device is operational. The breakdown of transducer elements often leads to a significant decline of electrical power input, so a decline would reliably indicate a malfunction of the device.
However, the converse conclusion, that the device is functioning properly if the electrical power input is in the correct range, is not valid. Monitoring the input power should be used to detect major defects of the device. The primary advantage of this test is the end user can easily conduct this procedure with a simple wattmeter at low cost.
Here's how to proceed:
- Connect a standard wattmeter between the ultrasonic cleaner and the electrical outlet.
- Fill the ultrasonic tank about 2/3 full with water and add some cleaning solution.
- Switch on the ultrasound (do not turn on the heater!).
- Compare the measured value on the wattmeter to the value indicated in the operating instructions. The deviation should not exceed +/- 15%.
- Keep a record of measured values.
Even if there is a deviation of power exceeding the given tolerance of +/- 15% the ultrasonic unit might still operate with sufficient power for the cleaning job at hand. In this case the cleaning results must be inspected more thoroughly.
Inspection of the ultrasonic power with the aluminum foil test
In addition to checking the power consumption, we recommend checking the power output with the aluminum foil test. This test is also quite simple for an end user to perform, but the results are not as easy to interpret. Carry out the test with a new unit and repeat it regularly under the same conditions to compare the results.
Follow this procedure:
- Place a support such as a wire or strip of masking tape lengthwise across the top of the tank. This will be used to support the foil.
- Fill an ultrasonic tank with water to the fill line or at least 2/3 full. Add cleaning solution.
- Degas the bath by running the unit for at least 10 minutes.
- Cut a piece of standard household aluminum foil (not heavy duty foil) to fit inside the tank vertically. Fold the foil over the support (or adhere it to the tape) such that it does not touch the bottom or sides of the tank.
- If the tank is large, this test should be performed with several pieces of foil to evaluate several areas (e.g. one in the center and two on the sides).
- Switch on the ultrasound (to maximum power if adjustable) and operate the unit for 1 minute.
- There should be visible dimpling or pinprick-like marks on the foil. If the foil remains smooth and shiny, the ultrasonic unit is not functioning properly.
- Dry the foil and store it in a transparent sleeve for comparison with foil tests performed at later dates. Mark the sleeve with the model and serial number of the unit tested.
The aluminum foil test described above is the easiest and most popular method for testing an ultrasonic cleaner. This method, along with other alternatives, is described in our post on ultrasonic cleaner performance validation.
Can chlorides contained in tap water, in cleaning media or in deposits on items being cleaned damage the ultrasonic tank?
Yes under certain conditions. The potential for damage is increased when using cleaning media with pH values in the acid range. If tap water contains chlorides, we recommend using cleaning chemicals in the alkaline range. If the cleaning job requires an acid cleaner use distilled water instead of tap water.
How often should I change the cleaning solution?
The lifetime of the solution depends primarily on how much soil is being removed from parts. Oily contaminants removed during ultrasonic cleaning cycles either rise to the surface or are suspended in the solution. Hard contaminants settle to the tank bottom and unless removed may cause damage. Solution replacement is signaled when cleaning efficiency drops off. Drain the tank and dispose of spent solution according to local regulations, and take the time to clean the tank following user manual instructions. Check the section "where contaminants go" in our post on how ultrasonic cleaners work. Note that solutions for cleaning used medical instruments should be replaced daily.
How should I maintain my ultrasonic cleaner?
Detailed maintenance instructions are provided in the user manual. For day-to-day operation be certain that your tank is properly filled with cleaning solution - designated by the fill line when parts are in the basket. Avoid overfilling and under filling. Continually skim off floating contaminants and set them aside. Replace cleaning solutions when efficiency drops off and dispose, along with skimmed off contaminants, following local regulations. Clean the tank to remove settled contaminants but do not scour.
Is it OK to run the heater for a prolonged period without turning on the ultrasonic power?
Not recommended because the heaters will cause discoloration on tank walls. When the ultrasonic power is operating the solution circulates in the tank to carry heat away.
What is cavitation erosion and why is it important?
Cavitation erosion is the primary process of wear and tear on an ultrasonic tank. The intense energy from collapsing cavitation bubbles repeatedly impacts the tank floor. This effect is typically most noticeable where the transducers are bonded to the tank. The constant bombardment from cavitation can lead to discoloration, pitting, thinning and eventually cracking of the tank floor.
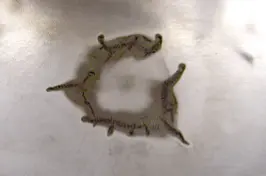
This image shows heavy cavitation erosion around the transducer system.
Although high quality ultrasonic cleaners are manufactured with special cavitation resistant stainless steel, long-term erosion cannot be completely eliminated.
Cavitation erosion may be accelerated by the following unfavorable factors:
- Abrasive particles removed during cleaning are allowed to remain on the tank floor. As the bottom of the tank vibrates during operation these particles can have the effect of tiny drills which can damage the floor of the ultrasonic tank.
- Use of low pH acidic cleaning agents in the presence of halides such as chlorides or bromides. These chemicals create aggressive acids which may damage the stainless steel.
- Use of concentrated alkaline solutions at elevated temperatures (> 60 deg C) may damage stainless steel.
- Placing items to be cleaned or cleaning containers directly on the tank floor.
- Level of cleaning liquid is too low.
Tank lifetime is maximized by:
- Keeping the tank bottom free of solid particles
- Using cleaning solutions that will not damage stainless steel
- Using appropriate accessories to keep soiled parts off the bottom of the tank
- Maintaining the liquid level in the tank at least 2/3 full
- Routinely utilizing the shortest run time and lowest ultrasonic power level that will accomplish the task at hand.
How can I avoid or remove discoloration in an ultrasonic tank?
Discoloration, also called furring, can result when highly calciferous water contacts hot surfaces and usually occurs around the heating elements. It can be prevented by using ultrasound to circulate the bath during the heating cycle to minimize hot spots. Furring can be removed fairly easily and gently with standard citric or phosphoric decalcifiers. Never use an abrasive cleaner on tank surfaces. We cover this in our post on tank discoloration.
Can I replace transducers on my cleaning tank?
Because this is a complex operation, we recommend that repairing or replacing transducers be done by a qualified technician in a service center.
Have questions about ultrasonic cleaning?
Tell us about your parts, soils, and throughput, and we will recommend the right equipment, accessories, and resources.
Contact us