Ultrasonic Cleaner Operating Tips
New ultrasonic cleaners are usually shipped with operating instructions. These may be misplaced. If you purchase a used sonic cleaner the manual may not be included. Improperly using this equipment can quickly damage it, which is why we’re presenting this post on ultrasonic cleaner operating tips. They are not in order of importance because all are important.
These tips are not comprehensive but they do cover a majority of cases. If you have questions please contact us whether or not we supplied the unit.
Cleaning Baskets
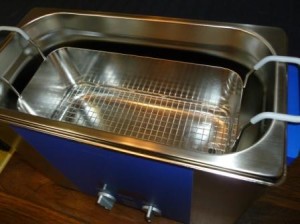
Parts being cleaned should never be in contact with the ultrasonic cleaner tank. Why? The ultrasonic vibrations caused by transducers mounted to the tank will cause parts to wear against the tank surface. Eventually this may result in a leak. Instead position what you are cleaning in parts baskets that are designed to fit the tank. For more on this see our post on basket design. It notes that cleaning larger parts may call for suspending them in the solution.
Solution Levels
Sonic cleaning equipment is designed to hold a specific volume of cleaning solution. Some tanks indicate the volume by a fill line; otherwise they should be approximately 2/3 full. Too much solution will impact cleaning efficiency; under-filled tanks may damage heaters and transducers. When filling the tank take into account solution displacement caused by parts being cleaned.
Load
Don’t overfill your basket with parts because that will decrease cleaning efficiency and possibly cause part damage due to them vibrating against each other.
Temperature
Heat usually improves cleaning efficiency but not always. Follow instructions on the cleaning solution formulation container. Cavitation produces heat and can warm solutions to as high as 60⁰ C. If temperature control is critical consider tanks with heaters or equip your unit with a cooling coil. For more on this see our post on temperature control.
Solution Maintenance
Repeated cleaning will result in decreased cleaning efficiency due to contaminant load. You can postpone this by skimming off contaminants that float to the surface and filtering the solution in large tanks but eventually you’ll need to replace the solution. Dispose of it along with skimmed off contaminants according to local regulations.
Cleaning Tank Maintenance
When you change solutions take the time to clean the tank to remove sediment and deposits that settle to the bottom. Rinse the tank with clean water and let it drain dry. Never use abrasive cleansers on a tank. Lime deposits can be removed by operating the cleaner filled with a solution of elma tec clean S1 diluted according to instructions.
Noise
While ultrasonic waves are above the level of hearing operating an ultrasonic cleaner will created noise due to tank wall vibration. Lower frequency cleaners are noisier than higher frequencies. Folks working in proximity to an operating cleaner may need to wear ear protection. A tank lid will also reduce the noise level. For more on this see our post on ultrasound and noise.
Ventilation
Ultrasonic activity causes vaporization of the cleaning solution, especially as it warms. For that reason we suggest placing your equipment in a well ventilated area. Covering the tank will capture this condensation with the added benefit of reducing noise.
And that’s not all, folks.
But it covers many of the common operating considerations when using an sonic cleaner. If you have any questions at all please contact our experts for sound advice on cleaning with ultrasound or visit our ultrasonic cleaner learning center.

