
Learn how ultrasonic energy applied to lab equipment cleaning helps ensure compliance with FDA & CGMP regulations.
FDA guidelines focus on eliminating cross-contamination and ensuring the integrity of analytical results. For many labs, achieving Current Good Manufacturing Practice (CGMP) standards means moving beyond manual scrubbing. Ultrasonic lab equipment cleaners when paired with the correct ultrasonic cleaning solution formula, have become the industry standard for cleaning delicate glassware, pipettes, and complex instruments safely and efficiently.
Ultrasonic lab cleaners quickly and safely remove
- Light grease
- Lime soap residues
- Fingerprints
- Dust
- Emulsions
- Marking label residues
- Mineral deposits
- Oxides
- And other contaminants
while protecting lab personnel from injury from breakage when handling complex, fragile and costly reusable laboratory equipment.
Why Ultrasonic Energy Wins in Cleaning Lab Equipment
Ultrasonic cleaners use the power and energy of imploding microscopic vacuum bubbles to loosen and carry away contaminants from all surfaces immersed in the ultrasonic cleaning formulation. These microscopic bubbles penetrate small diameter tubes and complex configurations common to lab equipment. They quickly remove contaminants unreachable by sprays and other mechanical methods.
The process is more completely described in How Do Ultrasonic Cleaners Work.
Ultrasonic Laboratory Equipment Cleaning Procedures
How to Select the Right Ultrasonic Lab Cleaner
While lab personnel have a broad choice of ultrasonic cleaners for lab equipment, in making a decision consider that these units can be utilized for other laboratory applications that make investments more worthwhile.
Equipment capacity and performance features are prime considerations in making purchasing decisions. Your unit’s cleaning tank must be of sufficient size to accommodate the size or quantity of equipment being cleaned per cycle.
Because cleaning is done in baskets, keep in mind that
- baskets holding lab equipment have dimensions slightly smaller than tank dimensions
- products being cleaned should not be stacked in baskets and
- products must be fully immersed in the ultrasonic cleaning solution
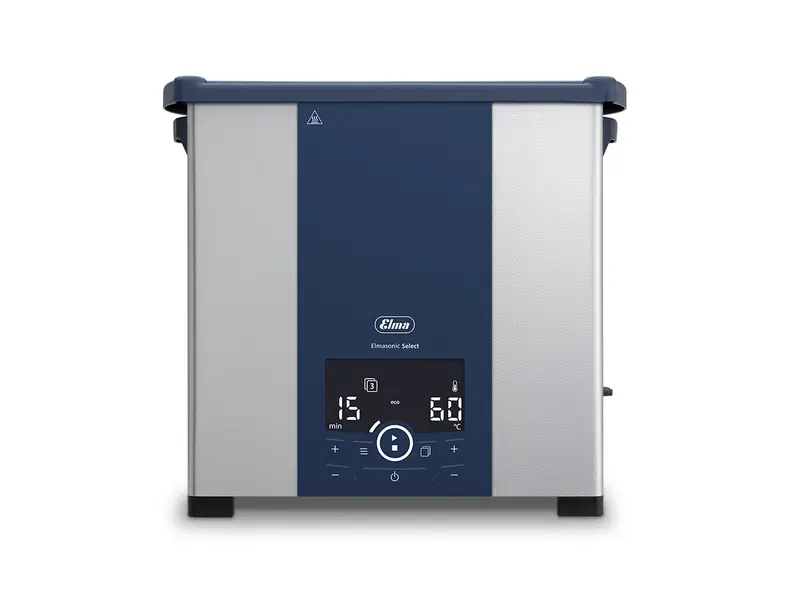
For purposes of discussion, we suggest the 3.4-gallon Elmasonic Select 120 with tank dimensions 11.8 x 9.4 x 7.9 inches (l, w, d) and recommended basket dimensions 9.8 x 7.7 x 5.3 inches. The Elmasonic Select series is offered in 11 tank sizes from 0.75 to 24 gallons.
A useful feature of the Elmasonic Select series is that it lets you program up to four commonly used laboratory equipment cleaning procedures. This greatly reduces set-up and monitoring time, allowing lab personnel to attend to other responsibilities. Here are other features and benefits offered by the Select series:
| Feature | Lab Benefit |
| Sweep Mode | Eliminates “dead zones” and “hot spots” for uniform cleaning |
| Pulse Mode | Delivers a 20% power boost for stubborn residues |
| Degas Mode | Removes air bubbles for immediate cleaning action |
| Dynamic Mode | Combines Sweep and Pulse for optimized lab equipment cleaning |
| Eco Mode | Quiet gentle cleaning for delicate lab equipment |
| Heaters | Quickly bring cleaning solutions to recommended temperature |
| Timers | Set for one minute to 6 hours and attend to other matters |
Selecting your Ultrasonic Cleaning Solution
The effectiveness of your labware cleaning protocol depends heavily on the chemistry used. Modern ultrasonic formulations are now biodegradable concentrates, making them both eco-friendly and cost-effective.
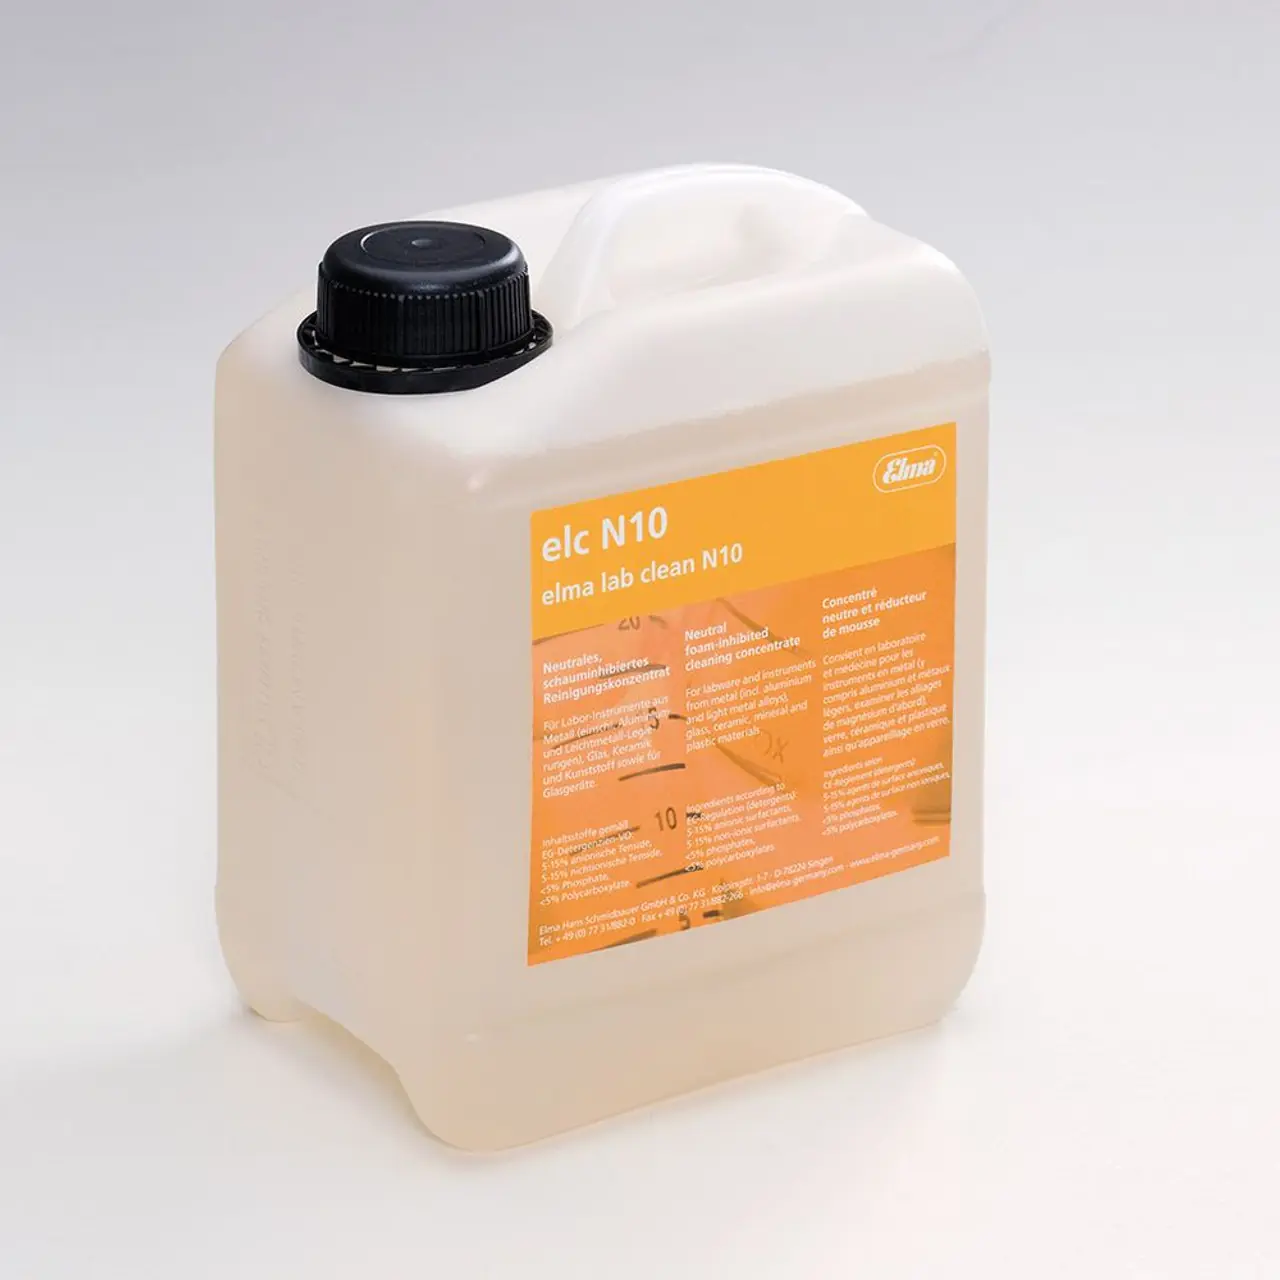
Featured Solution: Elma Lab Clean N10
For general laboratory use, we recommend a neutral formulation (pH ~7.1) Elma Lab Clean N10 at a recommended bath temperature between 30 and 75⁰C.
- Applications. Ideal for glass, metal, ceramics, and plastics.
- Removes light greases, oils, fingerprints, lime soaps, and marking residues.
- Dilution. Highly economical at a 2% dilution rate with water.
Ultrasonic Lab Equipment Cleaning – A Step-by-Step Protocol
Proper laboratory equipment cleaning procedures are vital for maintaining CGMP standards and ensuring the longevity of your instruments. While specific operating procedures vary by model, follow these industry-standard steps for an optimized ultrasonic bath:
1. Preparing the Ultrasonic Cleaning Solution
- Mixing the Solution by filling the tank halfway with water. Add the precise amount of ultrasonic cleaning concentrate (such as Elma Lab Clean N10) required for the full tank volume, then top off with water to the fill line.
- Degas by activating the Degas mode. This mixes the solution and removes trapped air bubbles in the fresh liquid which can otherwise absorb ultrasonic energy and reduce cleaning power.
- Pre-heat by setting the thermostat to the recommended temperature. High-quality cleaners like the Elmasonic Select units can be programmed to begin the cycle once the target temperature is reached.
2. Loading the Labware
- Use Baskets. Never place items directly on the bottom of the tank, as this can damage the transducers, tank bottom and items being cleaned. Use a stainless steel basket sized to the ultrasonic cleaner being used.
- Avoid Crowding by ensuring glassware and instruments are not stacked. Each surface must be exposed to the fluid for the cavitation bubbles to do their work.
- Immerse all items beneath the surface of the cleaning solution. Position hollow items like pipettes or tubes so that no air pockets are trapped inside.
3. The Cleaning Cycle
- Select the Operating Modes. Use Pulse or Dynamic when there arestubborn residues or Eco for quiet, gentle cleaning of fragile volumetric glassware.
- Cover the Tank. Always use a lid to reduce noise, prevent evaporation, and maintain a consistent temperature.
- Rinse & Dry once the timer expires. Remove the basket immediately. Inspect the equipment and perform a final rinse with distilled or deionized water to prevent water spots, then use a warm air dryer or allow to air dry.
Pro Tip:
“How often should I change ultrasonic cleaning solution?”
You should replace ultrasonic cleaning solution when cleaning efficiency visibly drops or the bath becomes heavily discolored.
Drain the tank and dispose of the solution according to local regulations, clean the tank following user-manual instructions then prepare and degas a fresh batch.
Beyond Cleaning: Versatile Laboratory Applications
While primary use focuses on decontamination, high-performance ultrasonic cleaners serve as multi-functional tools in the modern lab. By utilizing an ultrasonic bath for broader applications, you maximize your equipment investment and streamline laboratory workflows.
1. Advanced Sample Preparation
Ultrasonic energy is a cornerstone of modern sample preparation. These units function as laboratory sonicators, providing the consistent energy levels required for:
- API Extraction in the pharmaceutical industry. Sonicators extract Active Pharmaceutical Ingredients (APIs) from excipients.
- Content Uniformity & Potency Assays to ensure a homogenous mixture for accurate analytical testing.
- Dissolution rapidly dissolves active ingredients and chemical compounds into solution.
2. Emulsification and Homogenization
In the food, beverage, and cosmetic industries, achieving a stable mixture of immiscible liquids (like oil and water) is critical.
- Emulsifying. Create stable emulsions for lotions or food products without heavy mechanical shearing.
- Homogenizing breaks down particles to create a uniform consistency in complex formulations.
More information on using ultrasonic cleaners for these applications is found in our Laboratory Sonicator Guide: Applications, Benefits and Equipment Selection.
3. Safely Clean Fine Mesh Sieves
Standard cleaning methods can damage the delicate wires of fine mesh laboratory sieves. Specialized ultrasonic cleaners, such as the 7.4-gallon Elmasonic Select 300 paired with a matching sieve rotation option provides fast, safe sieve cleaning and rinsing.
- Efficiency – Cleans even the smallest apertures that manual brushing can damage.
- Longevity – Extends the life of expensive sieves by reducing mechanical wear.
Learn more about this process using the larger Elmasonic Select 300 or EP300H as described in our post safe cleaning fine mesh sieves.
Choosing the Best Ultrasonic Cleaner for Your Lab
Selecting the right equipment involves more than just tank size. To help ensure your cleaning processes meet FDA and CGMP compliance consider the following:
- Ultrasonic Modes – Look for units with “Sweep” or “Dynamic” modes for uniform and thorough cleaning, “Pulse” or “Dynamic” for removing tough contaminants, and “Eco” or Adjustable Power for cleaning delicate parts.
- Validation – Ensure your cleaning process can be validated for repeatable results.
- Technical Support – Work with experts who understand the science behind the sound.
Need Expert Guidance?
The scientists at Tovatech are available to provide unbiased information on equipment selection and cleaning chemistry. Whether you are performing complex sample prep or standard glassware maintenance, we can help you find the right fit.
Contact a Tovatech Scientist Today!